Wednesday, July 23, 2014

You will ride to Freiha

Dear Montreal reader, you will ride your bicycle through pretty neighbourhoods, tree-lined streets, and scenic riverside parks. At the end of your ride, you will eat something special.

Parc des Bateliers

You will start at Parc Lafontaine. There, you shall catch the northbound bicycle path on Rue Brébeuf. You will ride it all the way up to Boulevard Gouin, at the northern edge of the island. You will then turn left and follow the bicycle route. You will pass through a series of tranquil streets and verdant riverside parks until you reach the Lachapelle Bridge, at the very end of Boulevard Laurentien. Use the pathway on the west side of the Lachapelle Bridge to cross over to Laval, the mighty metropolis of Jesus Island. Turn left off the bridge and go around the futuristic school building to get to Boulevard Lévesque.

The architecture of Laval

From Lévesque, you will turn right onto 81st Avenue. You will follow 81st two blocks up, until Boulevard Pérron. There, you will turn. Your destination is Falafel Freiha at 3858 Pérron.

The Mighty Freiha

Freiha is a hyper-specialist: there is no sish taouk, shawarma, greasy potatoes or garlic sauce—only falafel. The menu offers two choices: a regular sandwich (two balls) or an “extra” sandwich (three balls). That’s it.

The key to Freiha’s supremacy is that the falafels are fried in small batches. They don’t sit under a hot lamp, and they certainly do not get reheated in microwave. When you order a sandwich, the balls are always warm and delightfully crusty, never more than a few minutes out of the fryer.

The wisdom of Freiha

The toppings are also unlike the competition. As per usual, there are tomatoes and those alarmingly pink pickled turnips. However, there are also pickled Lebanese cucumbers and, most crucially, big handfuls of coarsely chopped fresh mint and parsley. All of this is doused generously in a most unctuous tarator (sesame) sauce—so thick that it has to be scooped on, not squirted from a plastic squeeze bottle like everywhere else.

The juxtaposition of flavours and textures—the warm and crunchy balls, the cool and crisp pickles, the gooey sauce—and the copious herbs in Freiha’s falafel sandwiches are a delight under any circumstance. With an appetite sharpened by a scenic, 20 km bicycle ride, eating one is a near-ecstatic experience.

Do not expect friendly service or any smiles. You are here for the falafel, not for an exchange of phoney pleasantries. Good appetite.

Yes.

Tuesday, February 4, 2014

Only in Montreal

Dear obedient reader, a long time has passed since I have communicated with you through these pages. I promise you will see more activity here this year than in 2013.

Before I provide you with longer, substantive post, you will watch a little TV appearance I made recently on a CityTV show called Only in Montreal. The recipe for the soup, which is actually called chłodnik, not whatever bogus name the TV people gave it, was published here a while ago. I have of course also provided you with instructions on how to brine pork chops.

Speaking of Montreal, I trust those of you who live here have been assiduously reading me in the print edition of CultMTL. I also occasionally provide online content, which you can find here and in the right-hand column on this page.

Until soon.


Wednesday, May 9, 2012

Sausage Therapy


Making sausages at home is fun and easy. All you need to is two simple pieces of equipment: a meat grinder and a sausage funnel (Figure 1). By making your own sausage, you have total control over the contents—particularly the type and quality of the meat and the flavouring.

Hand-cranked grinders are easy to find and relatively inexpensive—starting at $30 for a new one. Be weary of used grinders—they often have worn or mismatched parts and might not work properly.

To get a sausage funnel, the best bet is to go to a restaurant supply store. Like parts for espresso machines, they come in standardized sizes. Be sure to buy a funnel of the same diameter as your meat grinder. I suggest you screw off and bring the ring from the front of your grinder with you to the store.

The ingredients and procedure described below is for making fresh sausages—ones that you must cook before eating. The same basic set of ingredients and procedures can also be used to make dried sausages. For those interested in making their own salami, Tim Hayward of the Guardian provides an excellent recipe.

Figure 1. Buy us, we're cheap.

Ingredients

All sausages contain three essential components: meat, casings, and salt. Usually, they also contain flavourings such as garlic, herbs, and spices.

Meat

You can use just about any kind of meat to make sausage. There is only condition that must be met: it must contain enough fat! Specifically, to be moist and flavourful, your sausage must contain about 25% fat. For pork sausage, I suggest using 50% pork shoulder (also know as Boston butt) and 50% pork belly, which yield roughly the right fat-to-lean ratio.

Casings

Natural sausage casings are made of animal intestines. Hog casings are the cheapest and most readily available (Figure 2). They are also relatively thin, which which makes them an ideal casing for fresh sausages. You will most likely have to see a butcher to get your hands on these. Here in Montreal, Portuguese butchers seem to be the most reliable and least of expensive source for hog casings.

Natural casings are typically sold packed in salt and frozen. You will need to soak them in water and separate them before use. If you have casings left over when you’re done making sausage, drain them, salt them very generously, place them in an airtight bag or container and store them in the freezer for future use.


Figure 2. Hog casings are dope.

Salt

The word “sausage” is derived from the Latin “salsus”, which means salted. In other words, sausage is by definition salted meat. Salt is essential not just for flavor but also for texture—it breaks down proteins in the meat, making sausages tender and springy. Any salt will do—rock or sea salt, with or without iodine. For fresh sausages, you need about 1.5-2.0% salt by weight (i.e., 15-20 g of salt per kilo of meat).

Flavourings

You can flavour your sausages with just about anything—the possibilities are endless. Innumerable combinations of herbs or spices and other things, like cheese or chopped vegetables, can be added. I provide a few suggestions below.

Two classic flavourings are garlic, fennel seeds, and pepper flakes for an Italian-style sausage and sage, thyme, marjoram, and chives for something approximating a British banger (Figure 3). One combo that I enjoy tremendously is pimentón (smoked paprika), garlic, and red wine.

Figure 3. Flavor Flav.

Procedure

Like all of life’s most pleasant activities, it takes two to make sausages. You can do it alone if you have a machine, but it’s far more pleasurable to do it with another person. One of you will pump, the other will receive the sausage. It’s a calming, almost therapeutic activity. The similarity to other life situations is uncanny.


You will follow this procedure:

  1. You will grind the meat coarse. If you do not own a motorized meat grinder (Figure 4), you may wish to ask a butcher to do this for you.
  2. You will add the salt (start with 1.5 teaspoons per kilo) and the flavourings to the meat and you will mix thoroughly. You must fry up and taste a small sample to check the seasoning. You will add more salt and flavourings if necessary and you will sample the meat again. You will repeat until satisfied with your meat.
  3. You will begin feeding the meat into the grinder. You will crank until a small knob of meat appears at the tip of the funnel.
  4. You will take a soaked piece of casing and put almost the entire length onto the funnel. I say almost because you must leave about an inch hanging off the tip of the funnel. This procedure should not be unfamiliar to most responsible adults.
  5. You will twist the end of the casing with your fingers several times to seal it. You will then resume cranking. The person on the receiving end should keep one hand over the funnel to control the rate at which the casing slides off. Some pressure is needed to insure that the resulting sausage is rigid (Figure 5). Everyone prefers a rigid sausage.
  6. You will continue cranking until you have filled the entire length of casing on the funnel. You will now have something that many of us wish they had: a very long sausage. Twist the tail end several times to seal it (Figure 6). You will repeat steps 4 through 6 until you have used up the meat.
  7. Now you will do the opposite of what many spam e-mails suggest: you will transform your long sausage into short links. At about 10 or 15 centimetres from one end of a sausage, you must gently push the meat inside the casing forward and back to create a gap. You will twist the resulting link about five times (Figure 7). You now have a sausage link. Repeat this along the entire length of the sausage, twisting every newly formed link in the opposite directions to tighten, not loosen, the previous slink.
  8. You will now separate the links using a knife or scissors. Don’t worry if the ends open up.

Figure 4. Grind.

Figure 5. Make it rigid.

Figure 6. Do the twist.

Figure 7. Hyperlink.


Note: If a casing bursts at any point during the pumping or the twisting process, do not despair. A burst sausage casing is no catastrophe; you won’t get a disease and you won’t contribute to the world’s overpopulation problem. When a casing bursts, you must seal it off before and after the break (by twisting). Feed any escaped meat back into the grinder and pump it into another casing. No cause for despair.

Your sausages are now ready to cook. They will keep uncooked in the refrigerator for a few days. For longer storage, you must place them in an airtight container and freeze.

A quick note about cooking fresh sausages: do it slowly! Whether grilling or frying (I prefer the latter), use gentle heat and turn the sausages frequently. They are done when golden brown and slightly sticky on the outside—after about 20 minutes.

Good appetite.

Thursday, March 15, 2012

Licensed to Grill

A version of this article appeared in the Montreal Mirror on March 15, 2012 (here).

Grilling means cooking by direct heat radiation. The food being cooked rests on a grill, at a certain distance from the heat source—usually, hot charcoals or rocks heated with a propane flame. As the familiar charcoal and gas-fuelled devices are for outdoor use only, grilling is a cooking method most of us use only in the summertime. That’s unfortunate because grilling is both a delicious and healthy way to cook things.

Grilling in the wintertime need not entail freezing one’s derrière. It can be done indoors, right on your stovetop! All you need is a cast iron grill pan—basically, a large skillet with ridges on the inner surface. This can be acquired at a kitchen specialty store for around $50.

It matters little whether your pan is circular or square. The most important thing is the shape of the ridges. They should be at least two centimetres apart and the valleys between them should be at least one centimetre deep. Beware of pans with shallow ridges placed close together! These will just fry foods rather than grill them.

Look at those ridges.

Notice that I said cast iron. Don’t even think of getting anything made of any other material, especially Teflon-coated aluminium. Teflon begins to disintegrate and emit toxic fumes at tempera­tures above 250°C (500°F), which you can easily achieve on a domestic stove. Yes, cast iron is heavy, but why not improve your musculature while you cook?

With use, cast iron naturally develops a non-stick property, not unlike that of Teflon. Your grill pan will not have this property straight out of the box, however. To develop it, you will have to allow layers of waxy fat to build up on the pan’s inner surface. This is called “seasoning” the pan. Even if the manufacturer of your new grill pan claims it is pre-seasoned, you should build up more seasoning by rubbing cooking oil over the inner surface with a piece of paper towel and heating the pan over high heat until the oil is smoking. Repeat the process four or five times, allow­ing the pan to cool before reapplying oil.

When the time comes to grill something on your stovetop, heat the empty pan on medium to medium-high heat. It’s a mistake to use high heat! You’ll burn your food and make a whole lot of smoke. Allow at least 10 minutes for the pan to heat up. Once that pan is hot (it should be smoking slightly), do just as you would on an your outdoor grill. Obviously, the surface area is a little more constrained so you may need to be prepared to cook things in batches.

Even at modest temperatures, grilling on a pan will inevitably produce some smelly, clothing-penetrating fumes. If you have a kitchen fan, I strongly advise you use it at full power. If you don’t, I strongly suggest cracking a window at least slightly open. After an indoor grilling binge in an unventilated kitchen several winters ago, my mother told me I would never reproduce smelling the way I did. She may have had a point.

To maintain your pan’s non-stick properties, avoid washing it with soap. Use only hot running water and scrub it vigorously with a non-metallic but stiff-bristled brush. The inner surface should remain somewhat oily-looking after washing.

Steak with Blue Cheese Butter Recipe


Moo.

Ingredients
  • 300–400 g well-marbled steak (about 2 cm thick)
  • 2 tbsp soy sauce
  • 2 tbsp olive oil
  • 1 tbsp butter
  • 50 g blue cheese
  • 1 tbsp Dijon mustard

Procedure
  1. Remove from fridge 30–60 minutes before cooking to bring the steak to room temperature.
  2. Coat both sides of the steak with soy sauce first, olive oil second.
  3. Put the grill pan on medium-high heat. While waiting for the pan to heat up, mash the butter, blue cheese and mustard together with a fork in a small bowl.
  4. Grill the steak, about five minutes per side for medium rare. If you want to impress someone with a sexy-looking lattice of grill marks (see photo), rotate the steak about 60° after three minutes of cooking on each side.
  5. Remove the steak from the pan, cover with a plate or foil and let it rest for five minutes. This is very important!
  6. Garnish with blue cheese butter and serve.

One.

Two.

Three.

Serves two normal people or one greedy fat bastard (i.e. myself).

Good appetite.

Thursday, October 13, 2011

Pleasure Tools


A version of this article appeared in the Montreal Mirror on October 13, 2011 (here).

When it comes to kitchen equipment, I believe in minimalism. As a general rule, the home cook should aim to have a basic set of high-quality, multi-purpose tools. Specialized, single-purpose tools are only worthwhile if they allow you to do something you could not accomplish with a multi-purpose tool, or could accomplish only through a great deal of agony. Home cooking, like other activities that result in the furtherance of human life, should be pleasurable.

Two narrowly specialized kitchen tools from which I have been deriving pleasure continuously for years now are the olive pitter and the lemon squeezer. In both cases, the tool’s arrival in my kitchen altered my relationship to the ingredient it helps to process.

The Olive Pitter
If you want to use olives in a dish while avoiding dental work, it is advisable to use pitted olives. The trouble with olives that are sold pitted is that they are usually crap. If you want to use really good olives, you will have to pit them yourself. If you have tried doing this without a dedicated tool—for instance, by slitting the olives and trying to squeeze out their pits—you will know that it is a pleasure tantamount to masturbating with a cheese grater.

Figure 1. An olive is shown who's boss.
Not so if you own an olive pitter, a small, simple tool that should set you back no more than $10 (Figure 1). You will be amazed by how fast, in fact, by how fun, it is to show those olives who’s boss. You can rip through a cupful of kalamatas in just a couple of minutes (Figure 2).

Do not confuse an olive pitter with a cherry pitter! They look similar but the latter has a much larger receptacle for the fruits; it will not hold olives snugly and instead of removing their pits it will turn them to pulp. Any merchant who tries to convince you otherwise is a big fat liar.

Figure 2. Look ma, no pits!


The Lemon Squeezer
The case of the lemon squeezer is somewhat different from that of the olive pitter, in the sense that most of us already have a specialized tool for extracting juice from lemons and other smaller citrus fruits—i.e., a juicer. I am referring to those ridged cones made of wood, plastic or glass that you impale lemon halves on and twist to wring out their entrails. They do effectively extract the juice, but they also take out pulp, pith, and seeds. Herein lies the problem with juicers: you just want the juice, not the other junk, and especially not the seeds. You have to take certain cumbersome steps to sepa­rate junk from the juice, straining it out with a sieve or removing it manually with a spoon.

Figure 3. That lemon got juiced.
The lemon squeezer, a tool that looks like a garlic squeezer on steroids, elegantly solves this problem (Figure 3). You load your lemon or lime half, flat side down, into a receptacle with small holes that only allow juice to pass through. This means you can squeeze the juice directly into your dish; the seeds, pith, and pulp are trapped inside the squeezer. No fuss, no muss.

Squeeze hard enough and you will not only extract every last drop of juice but also some of the extremely fragrant citrus oil from the rind! After squeezing, open the squeezer and tilt it over your compost or garbage bin and watch that dead, inside out lemon rind fall out along with the seeds. It’s so efficient it would give a German engineer a boner.

Tapenade Recipe
Having these tools will enable you to make dishes that would otherwise have been tedious, if not impossible, to make. For me, one such dish is tapenade—the classic, southern French olive paste. It requires significant quantities of both pitted olives and lemon juice. Below, I provide you with a recipe for tapenade that I believe to be vastly superior in taste (not to mention inferior in cost) to any of the prepared products available on the market.

Ingredients
  • 1 cup pitted black olives (works well with kalamata olives)
  • 2 tbsp capers
  • 8 anchovies
  • 2–3 cloves garlic juice of 1 lemon
  • 1 tbsp Dijon mustard
  • 3 tbsp olive oil
  • 2 tbsp finely chopped parsley
  • 1 tbsp finely chopped fresh thyme leaves
  • 2 tbsp brandy (optional)
  • 1 tsp freshly ground black pepper


Procedure
Put all of the above ingredients in a small food processor (Figure 4) and blend until a coarse paste forms (Figure 5). Very difficult!

Figure 4. Before.
Figure 5. After.
Tapenade is delicious on bread, with cheese and tomatoes.

Good appetite.

Tuesday, August 23, 2011

Pickle Yourself


In this installment, dear reader, I will show you how to make brine-fermented dill pickles, the superior way to preserve cucumbers. These are also know as "deli-style" or "kosher" dill pickles. They are made without vinegar.

The Science of Dill Pickles
Cucumbers, like other vegetables, can be preserved by immersion in a salty, acidic solution. The combination of salt and acid inhibits the growth of certain bacteria and therefore protects the cucumbers from spoilage and decomposition. Of course, it also considerably alters their texture and taste, usually in a very positive way.

The nature of the acid in which cucumbers are preserved can vary. Like many other vegetables, they can be preserved in vinegar. Any clear or lightly flavoured vinegar, such a cider or white wine vinegar, will do. But they can also be preserved in lactic acid produced through fermentation. This is nothing unusual; there are many other familiar foods, such as sauerkraut, yogurt, and even certain types of sausage, that are created through lactic acid fermentation, which gives them their complex, sour flavour while helping to extend their shelf life. You can easily tell a jar of vinegar pickles and fermented pickles apart; the fluid surrounding the pickles will be clear in former and always cloudy in the latter (fig. 1). Also, in grocery stores, the former will be found on the shelves whereas the latter will often be kept in a refrigerator.

fig. 1


Fermentation, strictly speaking, is any process that consists of bacteria or yeasts (or some combination thereof) consuming sugars and yielding another substance, such as alcohol or lactic acid. For some types of fermentation, a bacterial or yeast culture needs to be added to start the process. This is not the case with cucumbers—the bacteria we seek already naturally occur on their skin.

To get the right kind of fermentation—we are making pickles, not cucumber wine—we need the right kind of bacteria to grow. For this, we need to create the right kind of environment. Very conveniently, it just happens that friendly, lactic acid producing bacteria thrive in salty environments whereas their unfriendly, homicidal cousins don’t. So, to achieve lactic acid fermentation, cucumbers need to be submerged in brine with the right concentration of salt. Too little salt and the unfriendly bacteria may gain a foothold and destroy the cucumbers before they have a chance to sour. (They could also turn into poison.) Too much salt and the pickles may never sour, as even the friendly bacteria’s salt tolerance has its limits.

But why?
Why bother with this bacterial fermentation when you can just dump some vinegar on your cukes? The answer is that fermented pickles, in my not-so-humble opinion, taste better. They are less astringent and have a fuller, more complex, sour flavour. They happen also to be probiotic and are a source of the otherwise tricky to obtain vitamin K. Another advantage is that you can use their brine. In central European folk medicine, pickle (and sauerkraut) brine is thought to be an unparalleled hangover cure. Otherwise, Poles like me add fermented pickle brine to various soups, to a very delicious effect. One such soup is chłodnik (a.k.a., cold borscht).

Recipe
The key to success for fermented pickles is the relative quantity of cucumbers, water, and salt. If you have more or less cucumber, it is imperative that you adjust the amount of water and salt accordingly to get the right salt concentration in the end. I provide the quantities for 1 kg (2.2 pounds) of cucumbers to allow for easy multiplication. You will probably want to make more than just one kilo, as each kilo will yield about one-and-a-half to two one-litre (one quart) jars of pickles, depending on the size of your cucumbers. The remaining ingredients are flexible. You can change the quantities or omit them altogether (though only a fool would omit dill and garlic). I permit you to flavour your pickles as you like. Please express yourself!

Some people ferment their pickles in a single, large, non-metalic vessel and pack them into sterilized jars later, once they are sufficiently fermented. I prefer packing them into sterilized jars immediately and letting them ferment therein. This method involves less work and allows me to vary the flavourings across jars.

To sterilize, I wash my jars and lids thoroughly (use a dishwasher if you have one) and put them in the oven at 120°C (250°F) for 15 minutes. This is far easier and faster than immersing them one-by-one in boiling water and just as effective.

I add a piece of sourdough bread (whole wheat or rye) to each jar. Sourdough breads contain friendly bacteria and naturally occurring yeasts that will complement the bacteria that dwell on the cucumbers’ skin and help kick start the fermentation process. The greater diversity of bacteria will also impart the pickles with a fuller, funkier bouquet. This is a matter of preference—I permit you to leave the bread out.

Ingredients
To be multiplied to match the quantity of cucumbers:
  • 1 kg Kirby or other pickling cucumbers*
  • 34 g salt (iodine-free)
  • 700 mL water
  • 3-4 cloves of garlic

Per 1 litre (1 quart) jar:
  • 1 branch of dill flowers (fig. 2) or 1 tsp dill seeds
  • ½ tsp mustard seeds
  • ½ tsp black peppercorns
  • ½ tsp coriander seeds
  • ¼ tsp chili flakes
  • 1 bay leaf
  • 1 small square of sourdough whole wheat or rye bread (about 2 cm x 2 cm or 1” x 1”)

*The smaller the cucumbers, the better. They will have a thinner skin, be more crunchy, and be easier to pack into the jars.

fig. 2


Procedure
  1. You will mix the water and salt and bring to a boil in pot. You will allow the brine to cool to room temperature before using.
  2. You will thoroughly wash the cucumbers. You must remove any stems that remain attached to them. Discard any cucumbers that are excessively wilted, rotting, or moldy.
  3. You will fill the sterilized jars with the flavourings.
  4. You will insert the cucumbers into the jars. Pack as many as you can in up to 3-4 cm (1-1.5”) from the top of the jar to leave room for the bread and to ensure complete immersion in brine. Pretend you are doing a puzzle (fig. 3).
  5. You will put a square of bread in each jar, if using.
  6. You will fill the remaining space in each jar with the cooled brine. Make sure the cucumbers are completely immersed but leave a bit of headspace between the surface of the brine and the lip of the jar. If the fluid touches the lid, it may cause it to corrode.
  7. You will put the lids on the jars but you will not seal them tightly. Gases that form while the pickles ferment must be allowed to escape or the jars will pressurize.
  8. You must now store the jars somewhere away from sunlight, where they will be at room temperature.
fig. 3


After three or four days, you will have what are known as half-sour pickles. You may eat them at this point—they will be slightly sour but will still retain some of the natural freshness of a cucumber. If you want to keep some of your pickles in this half-sour state, you must transfer them to the refrigerator, which will effectively stop the fermentation process.

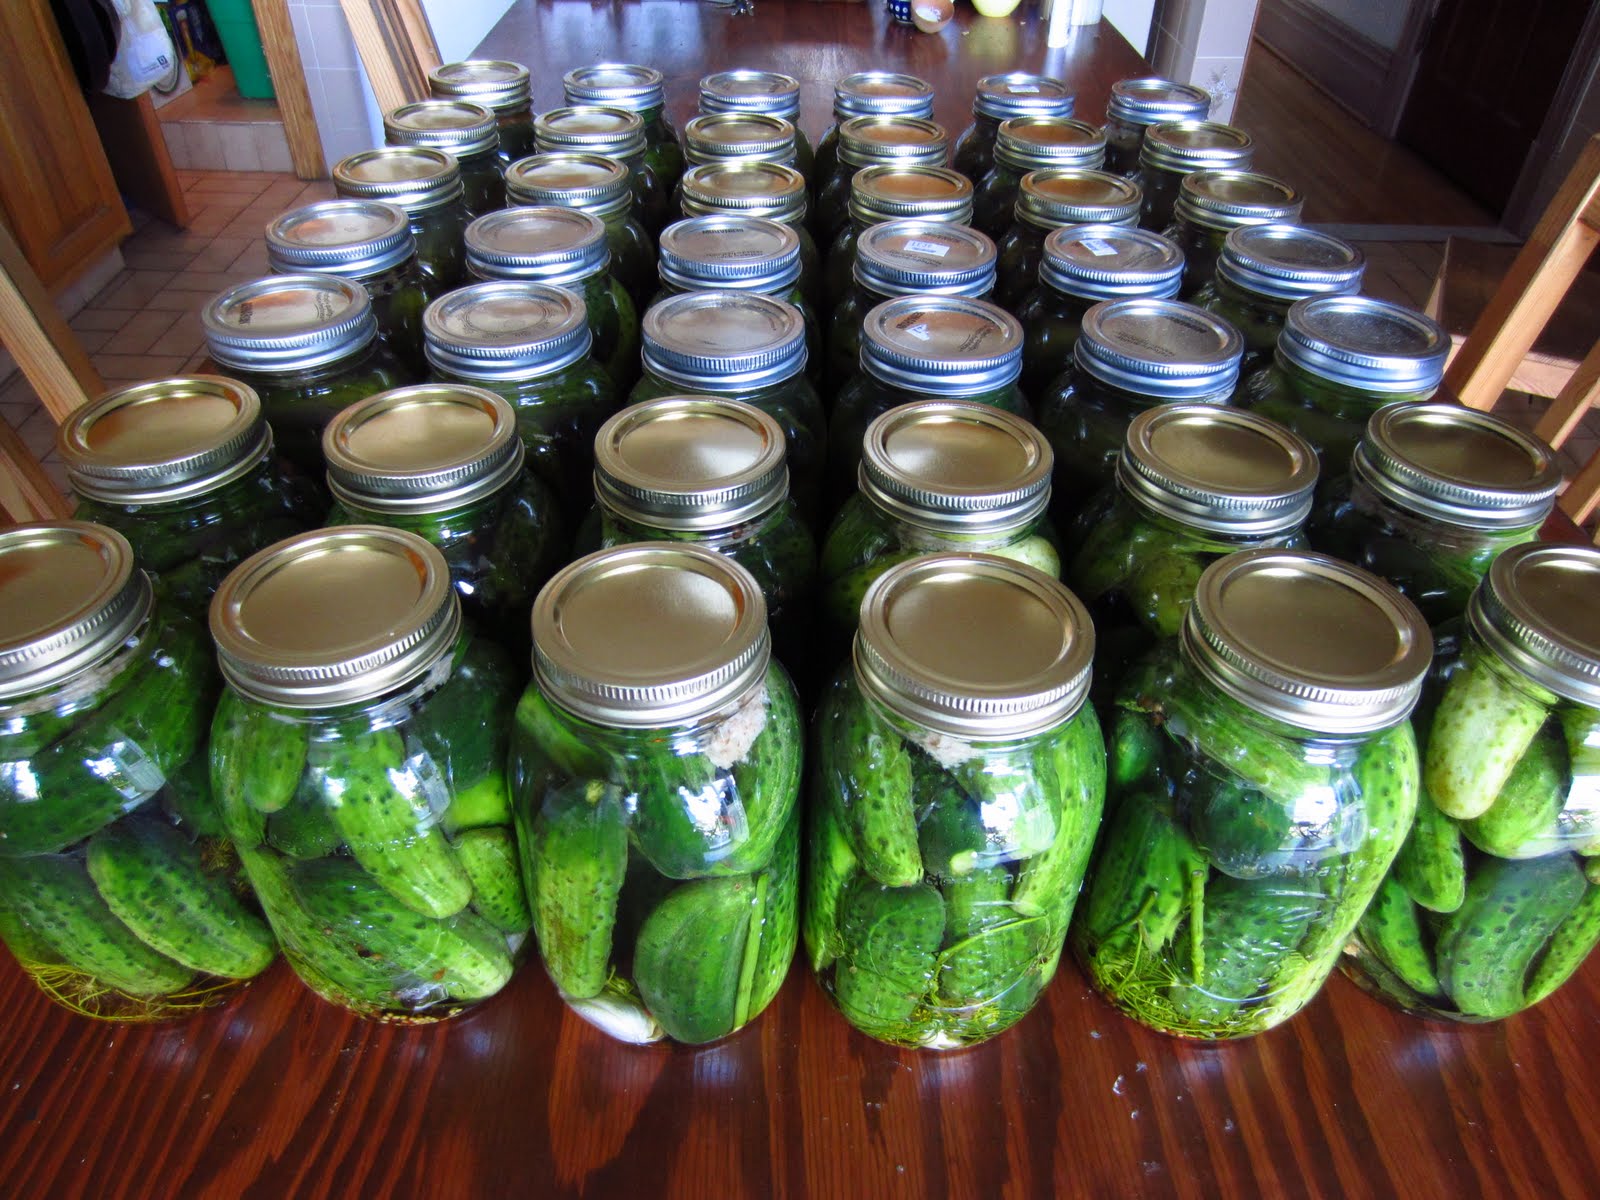
Those that remain at room temperature will become full-sour pickles after approximately two weeks. The cucumbers will have taken on the characteristic, dull yellow-green colour and the brine will have become cloudy (fig. 4). After this point, the environment in the jars will become so acidic that even the friendly lactic acid producing bacteria will stop functioning—they will have in effect pickled themselves to death. The fermentation process will therefore grind to a halt and the flavour of the pickles will stop evolving. You must now tighten the lids on the jars to prepare your pickles for long-term storage. They store perfectly well at room temperature for up to a year. However, after opening a jar, you should store it in the fridge and eat the contents within a month.

fig. 4


Good appetite.

Friday, July 15, 2011

You Will Eat Mackerel

Dear reader, in the present installment of Culinary Propaganda, I offer you three lines of argument for why mackerel (fig. 1), a surprisingly underappreciated fish, will be on your plate. I also suggest a few particularly delectable ways to enjoy mackerel, including an original Szef Bartek recipe.
fig. 1

The first line of argument is about being a responsible consumer of seafood. The global stocks of many species of fish have been considerably degraded over the last century, and some are on brink of total annihilation. Mackerel is not among these. On the North American Atlantic coast, it has long been and continues to be considered a junk fish. Few commercial fishermen seek it out as their primary target. Most are caught as by catch and are used as bait or for fishmeal. A friend originally from the Canadian east coast told me that, when she was growing up, fishermen there would ridicule anyone who wanted to eat mackerel.

Mackerel is also widely distributed on the other side of the Atlantic, where it receives only a modicum of respect. Certain Northern Europeans, including my own countrymen, occasionally eat it, mostly in smoked form (fig. 2).

fig. 2


As a sidenote for my fellow Montrealers, mackerel is not only a sustainable fish, but it could also be the closest thing we have to a locally caught saltwater fish. Its range starts in the Saint Lawrence River estuary, which is only a few hundred kilometers downriver from our city. The only hitch is that few fishmongers seem to have fresh mackerel. I have seen some at La Mer (1840 René-Lévesque E.). I have also found frozen raw mackerel from the Magdalen Islands at Loblaws, of all places. However, smoked mackerel, using fish from Canadian waters, abounds in local grocery stores. Yes, run-of-the-mill grocers like Metro and IGA carry them. You will look in the fish or the deli section.

The second line of argument has to do with the nutritional value of mackerel. Like other small, oily fish such as herring and sardines, mackerel are rich in those much sought after omega fatty acids, particularly those of the #3 variety. At the same time, they are free from (or certainly very low in) mercury and other fat soluble toxins that tend to permeate the flesh of larger predatory fish, such as tuna and swordfish. Pregnant and breastfeeding ladies, take note.

The third and most important line of argument in favour of mackerel is about its outstanding culinary properties. Mackerel’s flesh is firm, dark, and pleasantly flavourful, but not as pungent as herring or sardine. Mackerel are actually members of the tuna family and their flesh, after being skinned and boned, is surprisingly similar—like a miniaturized, albeit oilier, version of tuna. In my experience, where only small chunks or flakes of fish are required, canned mackerel can very successfully stand in for canned tuna.

Even when whole, mackerel is an easy fish to prepare. Its skin is free from scales and requires no cleaning. It can be left on for cooking but, if desired, it is very easy to remove. Another plus is that mackerel has rather large, thick bones for a small fish. After cooking, the backbone and spines will practically fall off of the flesh. And there won’t be any nasty, esophagus-puncturing surprises. If you want to cook boneless flesh, they are a cinch to filet, also thanks to the coarse nature of their bones.

Mackerel in the Kitchen
Mackerel take especially well to frying, roasting, and grilling. As they are robustly flavoured fish, they are best complemented by strongly flavoured garnishes and sauces, with lots of spice and acidity. Anything tart and tomato based, especially with garlic, will go with mackerel. Mackerel also make an excellent base for escabeche—a Spanish technique for preparing fish that involves frying fish along with aromatic vegetable then dousing the whole lot in wine and vinegar and letting it pickle overnight, to be served cold (try this excellent recipe). If you get some really fresh mackerel, you could also trying curing them in a mix of salt, sugar and dill—basically gravlax (or gravad lax) with mackerel in place of salmon. Hugh Fearnsly-Wittingstall, the food writer with possibly the most criminally British name, calls this “gravad max” (recipe here).

Mackerel, like salmon, also takes extremely well to smoking. In fact, mackerel in smoked form seems to be a lot more available, at least where I live, than in the raw form. This is not surprising, given how delicious it is—more delicious, I think, and certainly a lot cheaper than smoked salmon. I most often enjoy smoked mackerel on butter-smeared piece of toast or crisp bread, with a little squeeze of lemon juice. But I would also highly recommend trying it atop a bagel with cream cheese, in lieu of lox. Indeed, smoked mackerel makes an excellent substitute for smoked salmon pretty much in any situation where the latter’s pink colour is not crucial to the aesthetics of the dish.

More recently, I have also taken to experimenting with substituting bacon with smoked mackerel—with great success, I must say. The most fruitful of my adventures in substitution has been in realm of potato salad. A favourite simple recipe involves combining boiled young potatoes with a vinegary homemade mayo, diced bacon, dill, and green onions. Recently, I tried replacing the diced bacon with shredded smoked mackerel. This turned out to be rather tasty. I have since made a few additional embellishments to the recipe, such as replacing white wine vinegar with lemon in the mayo (lots of lemon!) and adding anchovies and capers for a flavour boost. I have codified and reproduced this recipe below for your benefit, dear reader. Obedience will be rewarded, trust me.

Szef Bartek’s Smoked Mackerel Potato Salad
Smoked mackerel should not be too hard to find. As noted above, they are readily available in grocery stores here in Montreal. For those of you residing in other cities, you are very likely to find some at a Polish, Russian, or German delicatessen near you.

Ingredients
  • 1 kg young potatoes (use young Yukon Gold if you can find them)
  • 1 tbsp salt
  • 2 smoked mackerel filets (approximately 250 g), shredded (fig. 3)
  • 1 bunch dill, chopped
  • 1 bunch green onion, white and green part, thinly sliced
  • 5-10 anchovy filets (optional)
  • 3-4 tbsp capers* (optional)
  • 1 quantity lemony mayo (recipe below)
    fig. 3

    *I prefer capers packed in salt to those packed in the vinegary liquid. In the latter type, I find the vinegar overwhelms the capers' floral perfume. They are after all unopened flower buds. If you get salt packed capers, rinse them thoroughly to remove the salt. You can soak them in water for a while to further  desalinate them.

    Procedure
    1. You must wash the potatoes thoroughly, scrubbing any black spots of dirt. If the potatoes are more than 3 cm in diameter, cut them in half. If they are more than 5 cm in diameter, quarter them.
    2. You will put the potatoes in a pot and cover them with water. You will add 1 tablespoon of salt. You will cover the pot and place it on maximum heat. When the potatoes come to a boil, you will turn the heat down to medium.
    3. While the potatoes are boiling, you will prepare the mayo (see below). After 15 minutes, you must check the potatoes’ tenderness with a fork. If fork does not penetrate easily, you will continue boiling them. You will check again every few minutes until fork penetrates easily. You will drain the potatoes and wash with cold water to cool them down.
    4. Once the potatoes are cool enough to touch (it is okay for them to be slightly warm), you will place them a bowl. You will now add all of the remaining ingredients to the bowl. You must mix thoroughly. You will check the seasoning and add salt and pepper as desired. Your mackerel potato salad is now ready to serve.


    Alternative Versions

    Szef Bartek’s Bacon Potato Salad:
    As noted above, this salad was derived from a recipe that involved bacon. Should you wish to make the bacon version, replace the mackerel with the same quantity of bacon and omit the anchovies and capers. Cut the bacon into small dice or strips and fry them until just slightly browned. Drain the fat and let the bacon bits cool before adding them to the salad.

    Szef Bartek’s Chorizo Potato Salad: Another variation on the theme I have tried and enjoyed very thoroughly involves using Portuguese chorizo instead of bacon. Likewise, cut the chorizo into small dice and brown it slightly in a frying pan; drain and cool before adding to the salad. A few drops of sherry vinegar before serving will give the salad a nice zing.

    Lemony Mayo
    Dear reader, if you have never made mayonnaise yourself, this recipe is likely to be quite an eye-opener. You will see how ridiculously easy it is. All you require is a small prep food processor or an immersion blender with a small receptacle. A full size food processor will not work as there will not be enough material for the blade to catch early on in the process.

    Note that lemon juice can be replaced lime juice or a vinegar of your choice. White wine vinegar in particular makes for a nice mayonnaise. Add some garlic to this recipe and you an aioli on your hands.

    Ingredients
    • 2 egg yolks
    • 1 tbsp Dijon mustard
    • 2-3 lemons, juiced
    • 1 cup of olive oil
    • salt
    Procedure
    1. You will put the yolks, mustard, and lemon juice in the blender receptacle.
    2. Turn on the blender and begin pouring in the oil slowly. Continue blending and gradually pour in the rest of the oil.
    3. You should now have a thick emulsion. You will taste it to check the seasoning. Add some salt if necessary.
    You’ve got mayo.

    Good appetite.